Making the switch from Webflow to WordPress is a strategic decision many businesses face. The right approach preserves your site’s design, content, and SEO value while unlocking new capabilities. As a web design agency that’s handled countless platform migrations, we know the critical factors that determine success.
The contrast between these platforms is significant. WordPress offers over 60,000 plugins compared to Webflow’s approximately 300 integrations, providing substantially more extensibility options for your website.
In this comprehensive guide, we’ll walk through the entire migration process. You’ll learn how to transfer your content, preserve your design elements, maintain SEO rankings, and optimize your new WordPress site for maximum performance. Let’s transform your Webflow site into a WordPress powerhouse.
Why Migrate from Webflow to WordPress?
Switching from Webflow to WordPress is a significant decision. Understanding the core differences helps evaluate if this move aligns with your business needs. Let’s examine why many organizations make this transition.
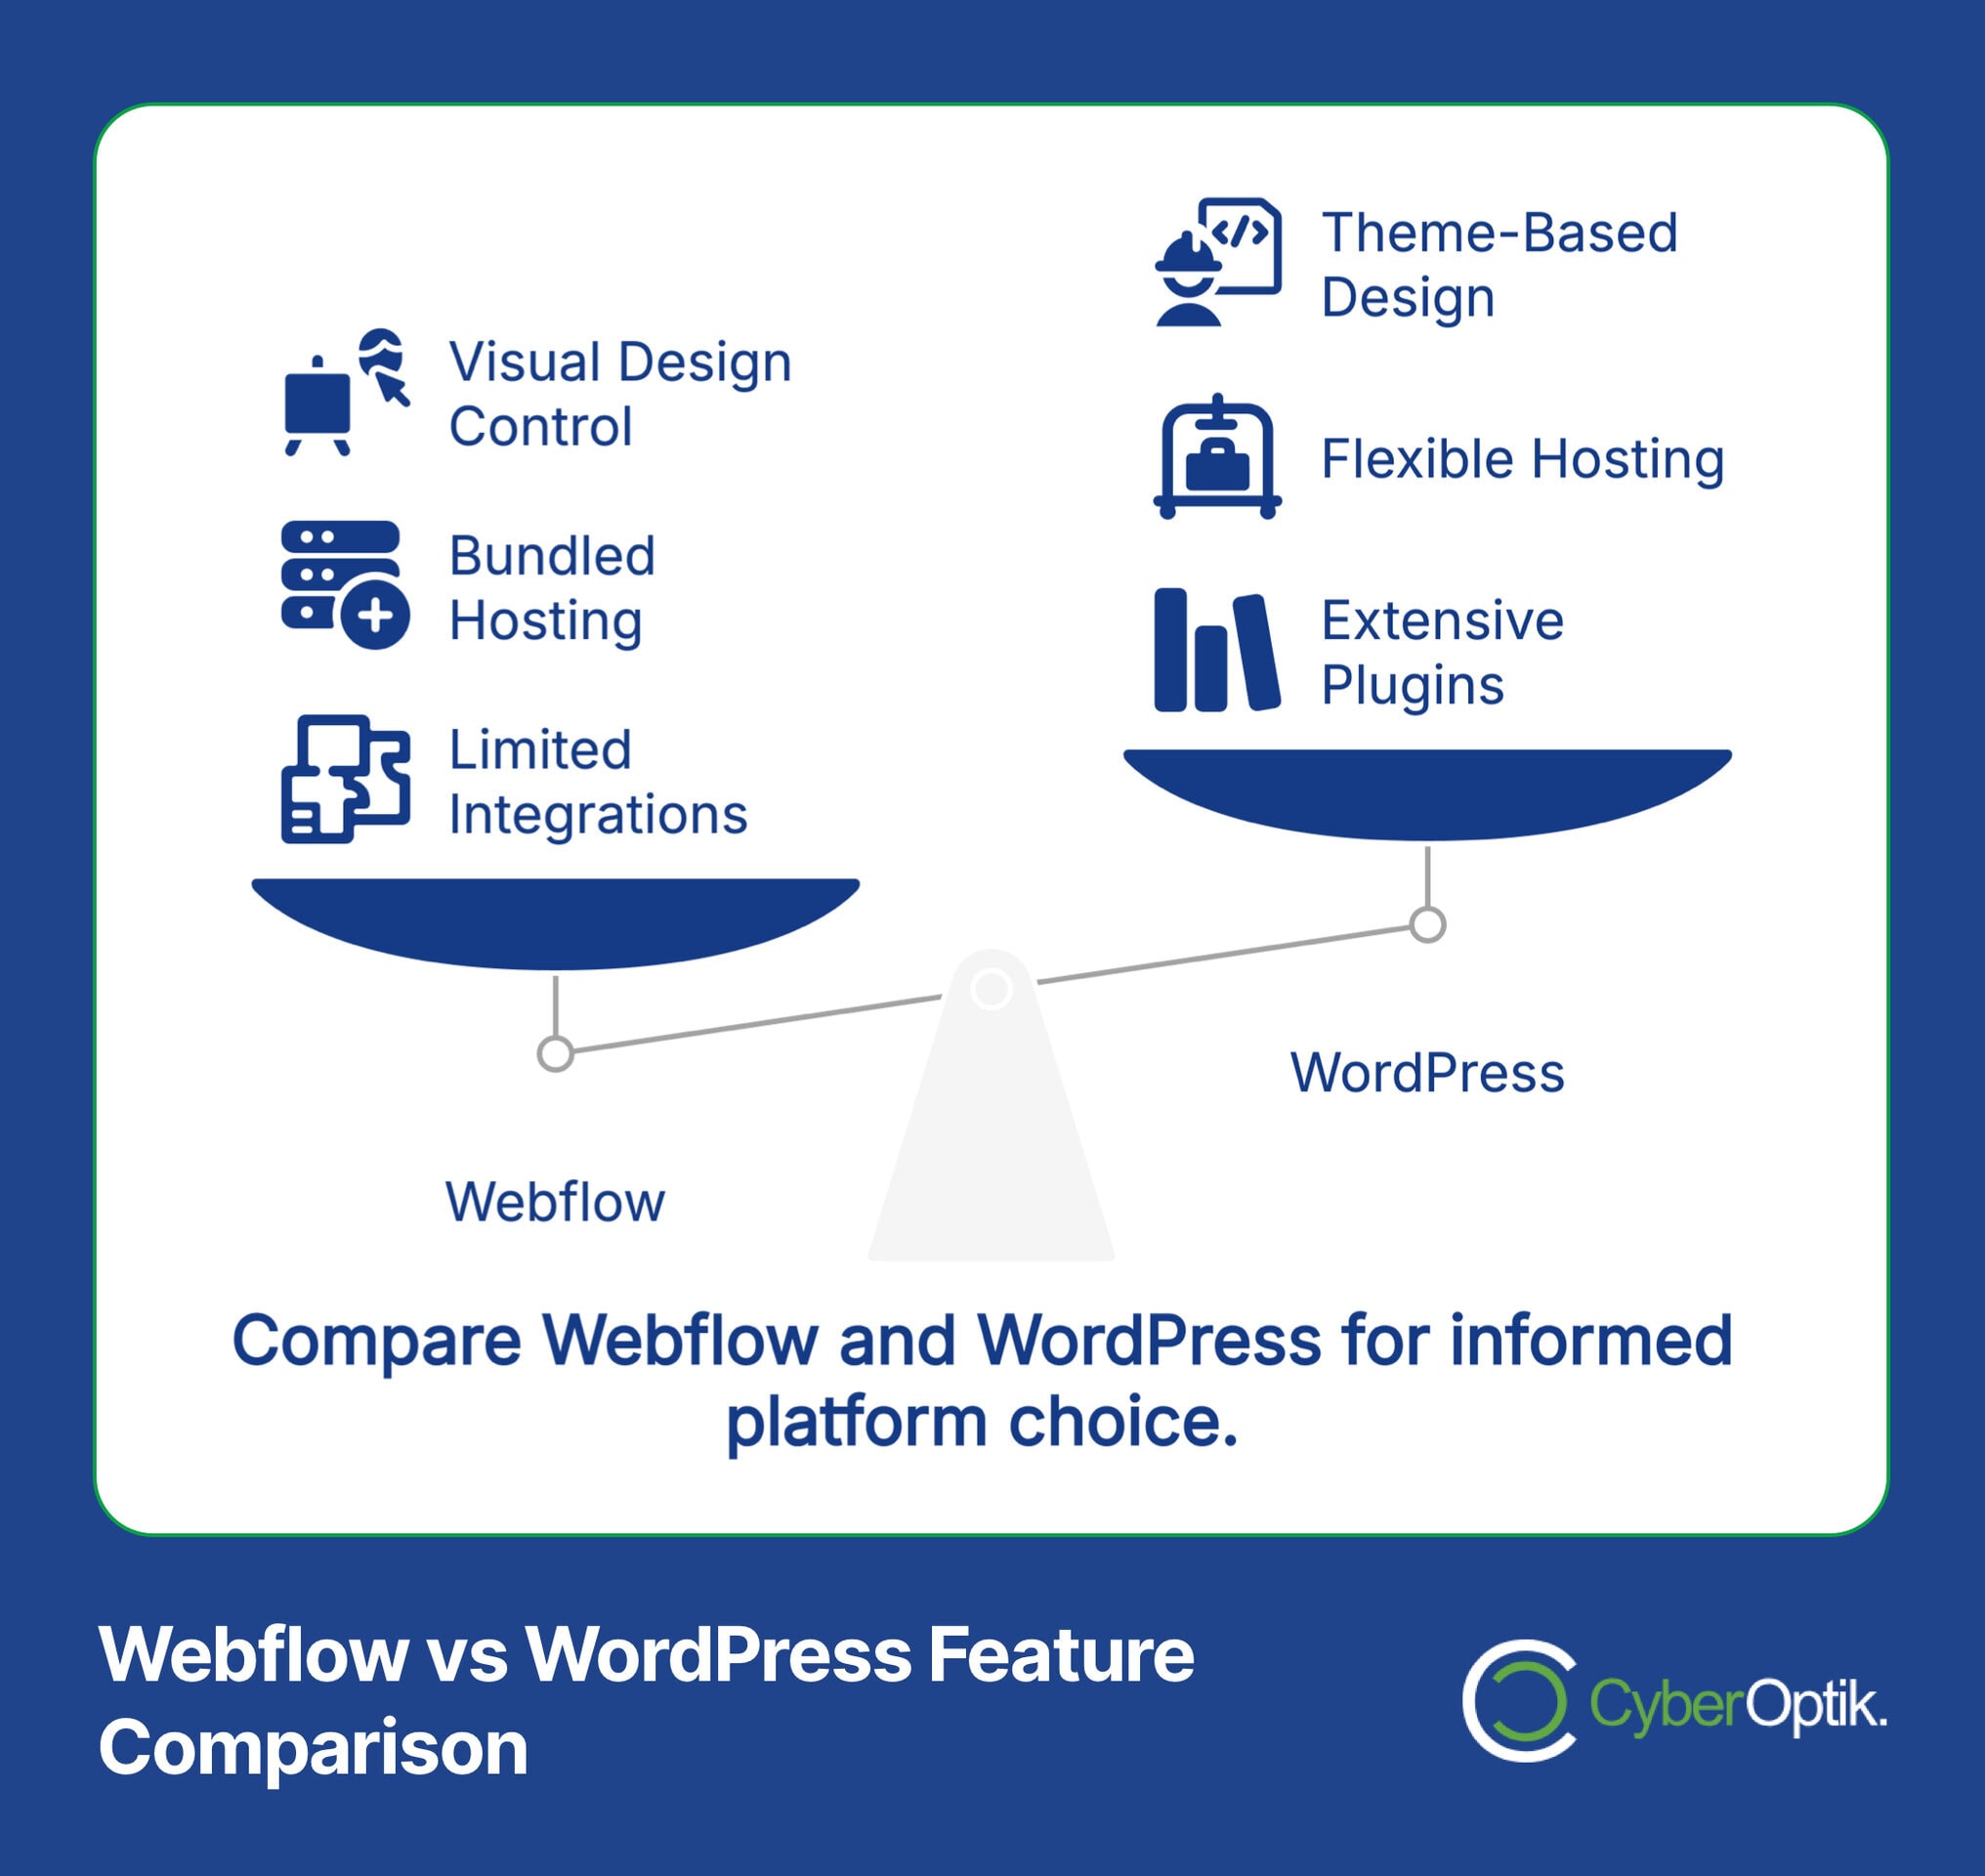
The fundamental distinction lies in how each platform operates. Webflow offers a hosted solution where design and hosting are bundled together. WordPress provides a self-hosted approach giving you complete control over your hosting environment and technical setup.
To help you understand the key differences between these platforms, we’ve created a comprehensive comparison of their core features and capabilities. This comparison highlights where WordPress might offer advantages that could benefit your specific situation.
| Feature | Webflow | WordPress |
|---|---|---|
| Extensibility | ~300 integrations | 60,000+ plugins |
| Hosting Model | Hosted solution | Self-hosted flexibility |
| Design Control | Visual designer with code export | Theme-based with page builders |
| Content Management | Built-in CMS with limitations | Robust, highly customizable |
| Learning Curve | Moderate | Low to moderate |
| Community Support | Growing | Extensive (largest CMS community) |
| Cost Control | Fixed pricing tiers | Highly flexible |
As the table illustrates, WordPress offers significantly more flexibility in areas like extensibility and hosting options, which can be crucial for growing businesses with evolving needs.
Here are some compelling reasons businesses choose to migrate from Webflow to WordPress:
- Greater extensibility – Access to thousands of plugins for enhanced functionality
- Cost flexibility – More control over hosting and maintenance expenses
- Advanced eCommerce – Robust solutions like WooCommerce for online stores
- Custom user roles – More granular control over user permissions
- Community support – Access to the world’s largest CMS community
Before You Begin: Migration Planning Essentials
Proper planning prevents poor performance. This old adage applies perfectly to website migrations. Before touching any code, create a solid migration plan.
Start with a comprehensive site audit. Document all pages, posts, custom post types, forms, and interactive elements on your Webflow site. This inventory serves as your migration checklist.
Next, select the right WordPress hosting provider. This decision impacts your site’s performance, security, and scalability. Many experts recommend managed WordPress hosting for its optimization and support benefits.
Choosing the right hosting solution for your new WordPress site will significantly impact its performance, security, and maintenance requirements. Below we compare the main hosting options available for WordPress websites.
| Hosting Type | Best For | Performance | Maintenance | Cost Range |
|---|---|---|---|---|
| Shared Hosting | Small sites, beginners | Basic | Self-managed | $3-10/month |
| VPS Hosting | Growing sites | Good | Self-managed | $20-60/month |
| Managed WordPress | Business sites | Excellent | Provider-assisted | $25-200/month |
| Cloud Hosting | High-traffic sites | Excellent | Varies | $10-200+/month |
| Dedicated Server | Enterprise sites | Premium | Self or managed | $100-500+/month |
For most businesses migrating from Webflow, managed WordPress hosting offers the best balance of performance and convenience, with providers handling technical aspects like updates and security.
Before beginning the technical migration process, complete these preparatory steps:
- Backup your entire Webflow site – Export all content, assets, and design elements
- Document your site structure – Map out page hierarchy and navigation
- Create a content inventory – List all pages, blog posts, and dynamic content
- Audit your SEO elements – Document meta titles, descriptions, and key URLs
With proper planning complete, you’re ready to begin the actual migration process. Let’s walk through each step in detail.
Step-by-Step Migration Process
Migrating from Webflow to WordPress follows a systematic process. We’ll break this down into manageable steps, each with specific actions and considerations.
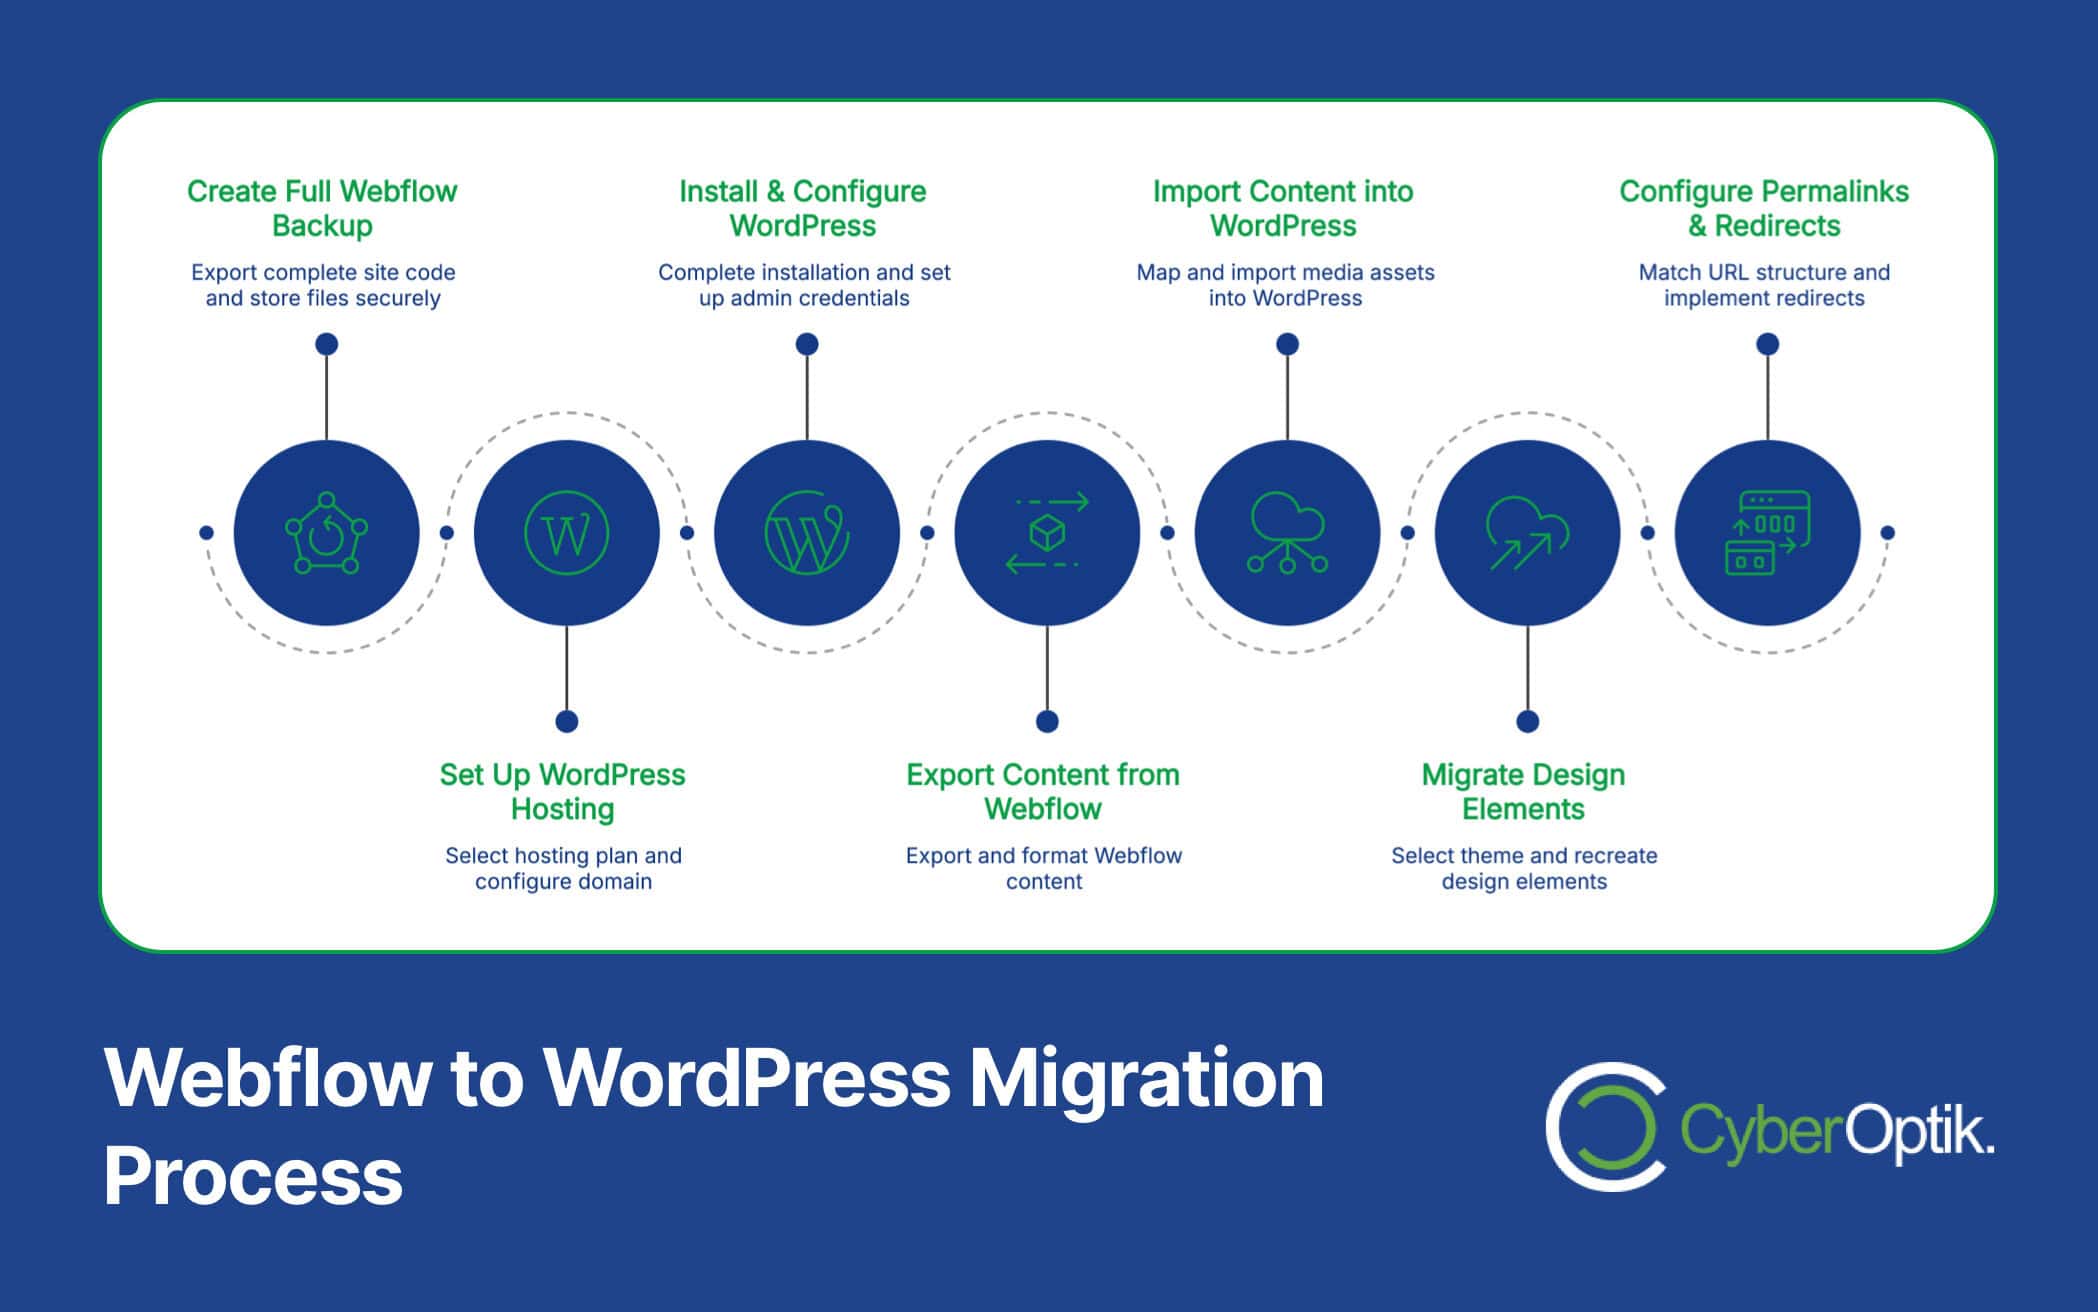
The migration process involves seven critical steps that have been confirmed across multiple professional migration services. This step-by-step approach ensures a complete and successful transition without overlooking critical elements.
To help set realistic expectations for your migration project, we’ve created a timeline showing each phase of the migration process along with typical timeframes required for completion. This gives you a clear picture of the overall project duration.
| Migration Phase | Estimated Timeframe | Key Activities | Dependencies |
|---|---|---|---|
| Planning & Preparation | 1-2 days | Site audit, hosting setup, backup creation | None |
| Content Export & Import | 1-3 days | Extracting content, importing to WordPress | Working WordPress installation |
| Design & Asset Migration | 3-7 days | Theme setup, design customization, asset import | Completed content import |
| Functionality Implementation | 2-5 days | Plugin installation, feature configuration | Design framework established |
| SEO Preservation | 1-2 days | 301 redirects, metadata verification | Final URL structure |
| Testing & QA | 2-3 days | Cross-browser testing, mobile responsiveness | All previous phases complete |
| Launch & Post-Launch | 1 day + monitoring | DNS updates, final checks, monitoring | Successful testing phase |
The complete migration process typically takes between 10-21 days depending on site complexity, content volume, and custom functionality requirements. Planning for this timeframe helps ensure a smooth transition.
Step 1: Create a Full Webflow Backup
Before making any changes, create a comprehensive backup of your Webflow site. This safeguards your content and provides a fallback option if needed.
To create a full Webflow backup:
- Log into your Webflow account and open your project
- Navigate to Project Settings > Export
- Choose “Export site”
- Download and safely store the .zip file containing your site’s code
Additionally, export your CMS collections as CSV files through the Collections panel in Webflow. This gives you structured content data for importing into WordPress.
Step 2: Set Up Your WordPress Hosting
Based on your requirements analysis, select and set up your WordPress hosting environment. Many migration experts recommend managed WordPress hosting for its optimization benefits.
During this stage:
- Purchase your selected hosting plan
- Set up domain name (but don’t change DNS yet)
- Configure SSL certificate
- Create database for WordPress installation
Step 3: Install and Configure WordPress
With hosting in place, install WordPress and establish the basic configuration. Most hosts offer one-click WordPress installation or you can manually install it.
Essential initial configuration includes:
- Setting up admin user credentials
- Configuring basic site information
- Setting permalink structure (critical for SEO)
- Installing essential plugins
Step 4: Export Content from Webflow
Now it’s time to extract your content from Webflow in a format that WordPress can import. The approach depends on your site’s complexity.
For Webflow CMS collections:
- Export each collection as CSV
- Clean and format the data if necessary
- Prepare media files for transfer
- Document any special content elements or custom fields
Step 5: Import Content into WordPress
With your content extracted, import it into WordPress using appropriate tools. WP All Import is a recommended plugin for this purpose, offering powerful mapping capabilities for complex content.
During content import:
- Map Webflow collections to WordPress post types
- Import media library assets
- Verify content formatting and structure
- Check for missing elements or formatting issues
Step 6: Migrate Design Elements and Assets
This step involves recreating your Webflow design in WordPress. There are several approaches depending on your technical resources and design requirements.
Design migration options include:
- Using a WordPress theme with customization
- Employing a page builder like Elementor or Beaver Builder
- Custom development using the Webflow export as reference
- Using specialized tools like Webflow Pages plugin or Udesly converter
Step 7: Configure Permalinks and URLs
Proper URL structure is critical for maintaining SEO value. Configure permalinks in WordPress to match your Webflow URL structure as closely as possible.
For URL structure preservation:
- Set permalink settings in WordPress (Settings > Permalinks)
- Document URL changes for redirect planning
- Test sample URLs to ensure correct structure
- Prepare for 301 redirect implementation

Preserving SEO During Migration
Maintaining your search engine rankings during migration requires careful attention to SEO factors. The preservation of your SEO value directly impacts your site’s visibility and traffic during and after the transition.
The most critical SEO preservation step involves implementing proper 301 redirects. These redirects tell search engines that your content has permanently moved to a new location, transferring most of your SEO authority to the new URLs.
To help ensure you don’t miss any important SEO elements during migration, we’ve created a comprehensive checklist of all SEO factors that need to be preserved when moving from Webflow to WordPress. Addressing each of these elements will help maintain your search rankings.
| SEO Element | Migration Action | Implementation Tool | Priority Level |
|---|---|---|---|
| URL Structure | Match original URLs or implement 301 redirects | Redirection plugin or .htaccess | Critical |
| Meta Titles | Transfer exact titles to new pages | Yoast SEO or similar plugin | Critical |
| Meta Descriptions | Transfer all meta descriptions | Yoast SEO or similar plugin | High |
| Image Alt Text | Preserve all image alt attributes | Manual review or import tool | High |
| Internal Link Structure | Update all internal links to new URLs | Better Search Replace plugin | High |
| Heading Structure | Maintain H1-H6 hierarchy | Content editor or theme settings | Medium |
| Structured Data | Re-implement schema markup | Schema Pro or similar plugin | Medium |
| Canonical Tags | Set up canonical URLs | Yoast SEO or similar plugin | Medium |
Focusing on these elements systematically ensures your SEO value transfers correctly to your new WordPress site, minimizing any negative impact on search visibility during the transition period.
Beyond implementing 301 redirects, additional SEO considerations include:
During the DNS propagation period, maintain both sites to prevent search engines from encountering unavailable pages. This dual-site maintenance approach helps preserve ranking signals and provides a smoother transition for both users and search engines.
Ensuring image alt text transfers correctly is particularly important for both accessibility and SEO. While many migration tools handle this automatically, verify sample images to confirm proper transfer.
After migration, submit your new XML sitemap to search engines through Google Search Console and Bing Webmaster Tools. This accelerates the discovery and indexing of your new site structure.
SEO Monitoring Tip
Set up rank tracking for key terms before migration to establish a baseline. After migration, monitor these positions closely for 4-6 weeks to catch and address any ranking fluctuations quickly. Use Google reviews and other trust signals to reinforce your site’s authority during this sensitive transition period.
Post-Migration Optimization
Once your content and design are successfully transferred, optimize your new WordPress site for maximum performance and functionality. This phase transforms a basic migration into a true WordPress powerhouse.
Start by installing and configuring essential WordPress plugins. These extend your site’s functionality far beyond what was possible in Webflow.
After completing your migration, installing the right WordPress plugins will help optimize performance, enhance security, and expand functionality. We’ve compiled a curated list of essential plugins specifically recommended for sites transitioning from Webflow to WordPress.
| Plugin Category | Recommended Plugin | Key Functionality | Why It's Important |
|---|---|---|---|
| Caching & Performance | WP Rocket or WP Super Cache | Page caching, GZIP compression, lazy loading | Improves load times and performance scores |
| SEO | Yoast SEO or Rank Math | Meta optimization, sitemaps, schema markup | Enhances search visibility and content optimization |
| Security | Wordfence or Sucuri | Firewall, malware scanning, login protection | Protects against common WordPress vulnerabilities |
| Backup | UpdraftPlus or BackupBuddy | Automated backups, scheduled exports | Provides disaster recovery options |
| Forms | WPForms or Gravity Forms | Advanced form creation, conditional logic | Replaces Webflow form functionality with more options |
| Analytics | MonsterInsights or ExactMetrics | Google Analytics integration, enhanced reporting | Provides actionable user data directly in dashboard |
These plugins address key functionality needs for most websites while providing significant enhancements over what was previously available in your Webflow environment. Each serves a specific purpose in creating a robust WordPress ecosystem.
Performance optimization is critical for user experience and search rankings. WordPress offers several advantages in this area, but requires proper configuration.
Key performance optimization steps include:
- Implement caching for faster page loads and improved server response times
- Optimize images through compression and lazy loading
- Minify CSS and JavaScript files to reduce file sizes
- Configure browser caching for returning visitors
- Consider a Content Delivery Network (CDN) for global audiences
WordPress caching and other optimization techniques can dramatically improve your site’s performance compared to your previous Webflow implementation. Proper configuration of these features will give your new site a significant speed advantage.
After implementing performance optimizations, test your site using tools like Google PageSpeed Insights, GTmetrix, or WebPageTest to verify improvements and identify any remaining issues.
Cost Considerations
Understanding the financial implications of migration helps set appropriate budgets and expectations. Let’s examine the cost factors involved.
WordPress hosting offers significant cost flexibility compared to Webflow’s fixed pricing tiers. This allows businesses to scale their hosting investment based on actual needs rather than predetermined packages.
To help you budget appropriately for your migration project, we’ve created a detailed breakdown of potential costs associated with moving from Webflow to WordPress. This comparison highlights both one-time migration expenses and ongoing operational costs.
| Cost Category | Webflow (Previous) | WordPress (New) | Cost Difference |
|---|---|---|---|
| Platform Fee | $16-212/month (depending on plan) | $0 (open source) | Savings |
| Hosting | Included in platform fee | $5-200/month (depending on needs) | Varies |
| Migration Service | N/A | $300-3,000 (one-time) | New expense |
| Design Implementation | N/A | $500-5,000 (one-time) | New expense |
| Premium Plugins | N/A | $0-1,000/year | New expense |
| Maintenance | Minimal (managed platform) | $0-200/month (depending on service level) | Potential increase |
The long-term cost advantage of WordPress becomes apparent when evaluating the total cost of ownership over a 2-3 year period, especially for growing businesses that require additional functionality and customization.
Migration costs can be managed through several approaches:
- DIY migration – Lower cost but more time-intensive and higher risk
- Partial assistance – Professional help with complex aspects only
- Full-service migration – Complete professional handling of all aspects
The complexity of your Webflow site directly impacts migration costs. Sites with custom animations, complex interactions, or extensive dynamic content require more effort to recreate in WordPress.
While automated migration tools can reduce costs, they often require manual refinement. The time investment for manual migration is significant, which should be factored into your decision if handling it internally.
Consider the long-term cost implications as well. WordPress typically offers more cost control over time, with the ability to select specific services and features rather than bundled packages.
Common Migration Challenges and Solutions
Even with careful planning, migrations may encounter obstacles. Recognizing common challenges helps you prepare effective solutions.
Based on our experience with platform migrations, we’ve identified the most common challenges businesses face when moving from Webflow to WordPress. This table outlines these issues along with proven solutions to address them effectively.
| Challenge | Impact | Solution | Prevention Tip |
|---|---|---|---|
| Content formatting inconsistencies | Visual differences between old and new site | Manual review and formatting adjustment | Test import with sample content first |
| Missing or broken images | Incomplete visual experience | Use media management tools to identify and fix | Export all media separately before migration |
| URL structure changes | Broken links, lost SEO value | Comprehensive 301 redirect mapping | Plan URL structure in advance |
| Complex animation recreation | Loss of interactive elements | Use specialized WordPress animation plugins | Inventory all animations before migration |
| Form functionality differences | Data collection issues | Implement advanced form plugins with similar logic | Document all form fields and conditions |
| Performance regression | Slower page load times | Implement caching and optimization plugins | Set up performance monitoring early |
| Plugin conflicts | Functionality issues | Systematic testing and conflict resolution | Add plugins incrementally, testing each |
Anticipating these challenges allows you to build appropriate contingencies into your migration plan, potentially saving significant time and preventing common pitfalls that could impact your site’s functionality or search visibility.
Data loss risks can be significantly reduced by using automated migration tools and maintaining comprehensive backups. Always have a restore point available in case issues arise during the transition process.
Post-migration SEO monitoring is essential. Track rankings for key terms, analyze organic traffic patterns, and check Google Search Console for indexing issues or crawl errors. This proactive approach allows you to quickly address any SEO problems before they significantly impact your visibility.
If you encounter severe migration issues, having a contingency plan is critical. This might involve temporarily reinstating your Webflow site while resolving problems with the WordPress implementation.
Expert Tip: Phased Migration
Consider a phased migration approach for complex sites. Migrate and launch sections of your site sequentially rather than all at once. This reduces risk and allows for more focused quality control throughout the process. Start with lead capture pages that can quickly demonstrate WordPress advantages before moving to more complex sections.
Conclusion
Migrating from Webflow to WordPress represents a strategic investment in your website’s future capabilities and flexibility. While the process requires careful planning and execution, the long-term benefits often justify the effort.
The seven-step migration process we’ve outlined provides a structured approach to transitioning between these platforms while preserving your valuable content and SEO equity. By following this guide and leveraging the right tools, you can achieve a successful migration with minimal disruption.
Remember that WordPress website development is an ongoing process. After completing your migration, continue optimizing your new WordPress site to take full advantage of its extensive capabilities and ecosystem.
If you’re considering migration but feel overwhelmed by the technical requirements, our team specializes in seamless Webflow to WordPress transitions. We handle everything from content migration to design implementation, ensuring your new WordPress site preserves everything you value while unlocking powerful new possibilities.