Domain transfers intimidate many website owners. Moving from Blogger to WordPress while keeping your custom domain requires several precise steps. We regularly help Chicago business owners make this transition smoothly. A successful migration preserves your SEO rankings and website traffic.
WordPress offers significant advantages over Blogger for growing businesses. The platform provides better customization options, stronger security, and superior SEO capabilities. However, transferring your domain incorrectly can lead to downtime or lost search rankings.
This guide walks you through each step of moving your custom domain from Blogger to WordPress. We’ll cover content export, DNS configuration, permalink structure, and proper redirects. By following these instructions carefully, you’ll complete your migration successfully.
Before You Begin: Preparation Steps
Preparation is crucial for a successful domain transfer. Rushing into the process without proper planning often leads to problems. Website migrations require careful timing and attention to detail. Let’s review what you need before starting.
First, gather all your login credentials. You’ll need access to your Blogger account, domain registrar, and new WordPress hosting. Keep these details handy throughout the process. Double-check everything now to avoid delays later.
Next, understand the overall timeline. Domain transfers don’t happen instantly. DNS changes typically take 24-48 hours to propagate worldwide. Plan your migration during a low-traffic period for your website. This minimizes potential disruption to your business.
The following table outlines essential items to prepare before beginning your domain transfer:
| Requirement | Description | Why It's Important |
|---|---|---|
| Blogger account access | Admin credentials for your Blogger site | Required to export content and remove custom domain |
| Domain registrar access | Login for where your domain is registered | Needed to update DNS nameservers |
| WordPress hosting | Active hosting account with WordPress installed | Your new website platform |
| Backup of Blogger site | Complete export of all content | Prevents content loss during transfer |
This preparation checklist ensures you have everything needed before starting the technical steps.
Backup Your Blogger Content
Always back up your content before any major website change. Blogger provides a simple export function for this purpose. Creating a complete backup protects your content if anything goes wrong during migration.
To backup your Blogger site:
- Log into your Blogger account
- Navigate to Settings → Manage Blog
- Click on “Back up Content”
- Save the XML file to your computer
Keep this backup file in a safe location. You’ll need it for the WordPress import process later. This file contains your posts, pages, comments, and other site content.
Set Up WordPress Hosting
Quality hosting impacts your website’s performance. Choose a reputable WordPress hosting provider for your new site. Many hosts offer one-click WordPress installation to simplify setup.
After purchasing hosting, install WordPress on your domain. Most hosts provide detailed guides for this process. If you purchased a managed WordPress hosting plan, the platform may already be installed for you.
Install WordPress
Your new WordPress installation needs basic configuration. Complete the initial setup by creating an admin user with a strong password. Set your site title and description during this process. Confirm your email address to enable important notifications.
Don’t worry about design yet. Focus on the technical migration first. You can customize your theme and layout after completing the domain transfer.
Understand Domain Management Basics
Domain management involves several technical concepts. Understanding these basics helps you complete the transfer successfully. DNS (Domain Name System) connects your domain name to your hosting server.
Nameservers are specific servers that tell the internet where to find your website. When you change nameservers, you’re essentially pointing your domain to a different hosting provider. This is a key step in the migration process.
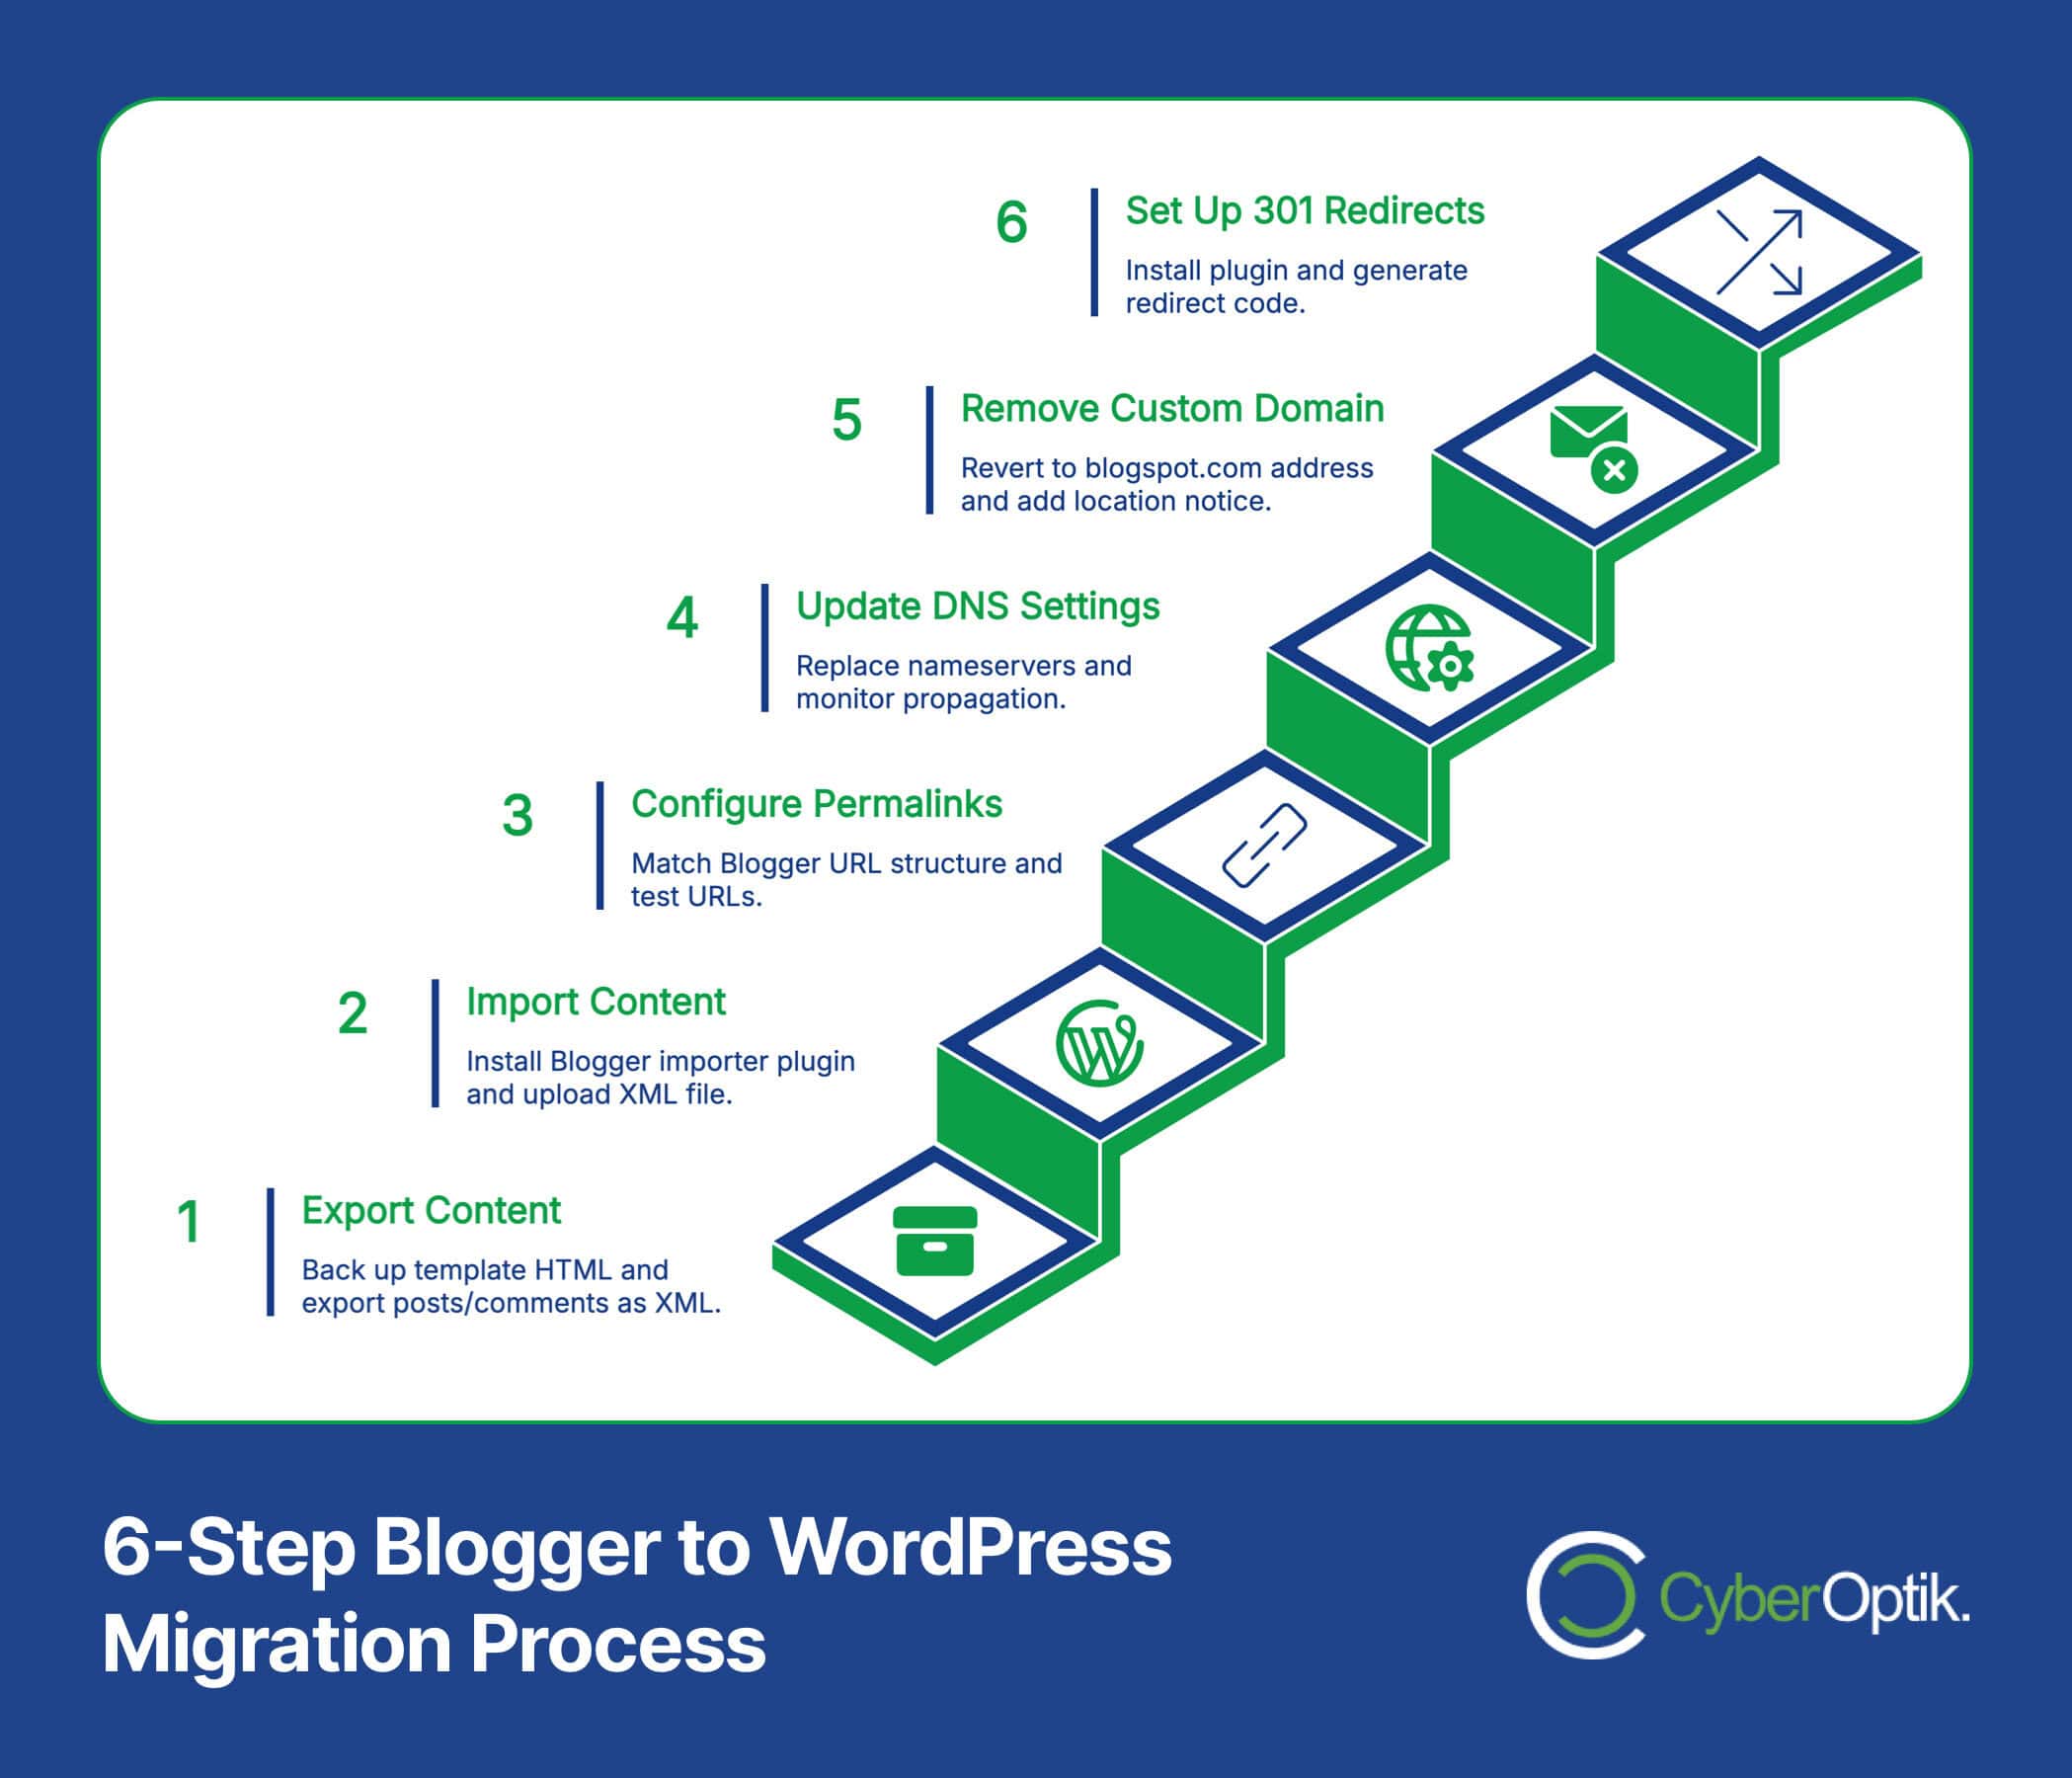
Step 1: Exporting Your Content from Blogger
Content export is your first active step in the migration. Blogger stores all your posts, pages, and comments in a structured format. This data must be properly exported before importing to WordPress.
The export process downloads an XML file containing your content. This file format preserves your post dates, categories, tags, and comments. WordPress can read this format with its import tools.
Backing Up Your Templates
Your Blogger template contains custom design elements. WordPress uses a different theming system, so direct template transfer isn’t possible. However, saving your template helps recreate design elements later.
To backup your template:
- Go to Theme in your Blogger dashboard
- Click the dropdown menu under your active theme
- Select “Edit HTML”
- Copy all code and save it to a text file
This template code helps your developer match design elements in WordPress. Take screenshots of your current site design as visual references too.
Exporting Posts and Comments
Exporting your Blogger content is straightforward. According to WPBeginner, you’ll navigate to the Settings → Manage Blog section to access the backup function. (Source: WPBeginner)
- Log into your Blogger account
- Click on Settings in the left sidebar
- Select “Manage Blog” option
- Click “Back up Content”
- Download the XML file to your computer
The export file contains all your posts, pages, comments, and metadata. Check that the download completed successfully before proceeding. This file becomes your content insurance during the migration process.
Step 2: Importing Content to WordPress
WordPress makes importing content from other platforms simple. The platform includes built-in tools for various content management systems. These importers maintain your post dates, categories, and comments.
Before importing, ensure your WordPress installation is ready. Install any essential plugins and select a basic theme. You can refine the design after completing the content migration.
Installing the Importer Plugin
WordPress requires a specific plugin for Blogger imports. This tool understands Blogger’s XML format and maps it to WordPress content types. Installing this plugin takes just a few clicks.
To install the Blogger importer:
- Go to your WordPress dashboard
- Navigate to Tools → Import
- Find “Blogger” in the list and click “Install Now”
- After installation completes, click “Run Importer”
The plugin adds itself to your WordPress tools menu. Keep your Blogger export file ready for the next step. The importer needs this file to transfer your content.
Uploading and Running the Import
With the importer installed, you’re ready to transfer your content. The import process may take several minutes depending on your site size. According to Kayleigh Zaraa, large media files may require separate handling during the import process. (Source: Kayleigh Zaraa)
To import your content:
- On the importer screen, click “Choose File”
- Select your Blogger XML export file
- Click “Upload file and import”
- Map Blogger authors to WordPress users
- Check the box to download attachments (if desired)
- Click “Submit” to begin the import
The system will process your posts, pages, and comments. You’ll see a success message when the import completes. Check your Posts section to verify everything transferred correctly.
Handling Media Files
Media files require special attention during migration. Images embedded in your posts may still link to Blogger’s servers. This creates external dependencies for your new site.
WordPress offers two approaches for media:
| Approach | Pros | Cons |
|---|---|---|
| Leave images on Blogger | Faster migration process | Creates dependencies on Blogger servers |
| Import images to WordPress | Complete ownership of all content | Longer import time, may require separate tools |
| Hybrid approach | Import key images, leave older ones | Requires manual organization and tracking |
| Manual reimport | Highest control over organization | Very time-consuming for large sites |
We recommend importing images to your WordPress server. This gives you full control over your content. Check the “Download and import file attachments” option during import to transfer media automatically.
For large sites, media import may time out. If this happens, try splitting your export file into smaller chunks. You can also use a specialized migration plugin or import posts first, then handle media separately.
Step 3: Setting Up Proper Permalink Structure
Permalink structure affects your SEO significantly. Changing URLs without proper redirects can cause search ranking losses. Your WordPress permalinks should match your Blogger URL pattern closely.
Blogger typically uses a year/month/post-name.html format for permalinks. WordPress can replicate this pattern through its permalink settings. Making this match minimizes redirect complexity.
Understanding Permalink Structure
Permalinks are the permanent URLs for your content. They determine how search engines and users find your posts. Consistent permalinks help maintain your search engine rankings during migration.
Let’s examine how permalink structures differ between platforms:
| Platform | Typical Permalink Pattern | Example |
|---|---|---|
| Blogger | /year/month/post-name.html | /2023/04/my-blog-post.html |
| WordPress Default | /?p=123 | /?p=123 |
| WordPress Custom | /year/month/post-name/ | /2023/04/my-blog-post/ |
| WordPress Custom + .html | /year/month/post-name.html | /2023/04/my-blog-post.html |
Notice how WordPress can be configured to match Blogger’s format exactly. This is crucial for maintaining SEO during migration.
Configuring WordPress Permalinks
WordPress permalinks are customizable through the dashboard. The correct setting matches your Blogger format precisely. This minimizes the need for complex redirects later.
To configure permalinks in WordPress:
- Go to Settings → Permalinks
- Select “Custom Structure”
- Enter: /%year%/%monthnum%/%postname%.html
- Click “Save Changes”
This setting creates URLs identical to Blogger’s format. According to IsItWP, this is crucial for preserving your SEO rankings and preventing broken links. (Source: IsItWP)
After saving, check several post URLs to verify the format matches your Blogger structure. Even small differences can cause redirect issues. Take time to get this step right before proceeding.
Step 4: Updating DNS Settings
DNS settings connect your domain name to your hosting server. Changing these settings redirects visitors from Blogger to your new WordPress site. This is a critical step in the migration process.
Your domain registrar manages DNS settings. This might be Google Domains, GoDaddy, Namecheap, or another provider. You’ll need login access to this account for the next steps.
Accessing Your Domain Settings
First, identify where your domain is registered. This information appears in your domain’s WHOIS record. If you’re unsure, check your email for domain registration confirmations.
Log into your domain registrar’s website using your account credentials. Navigate to the domain management section. Look for DNS settings, nameservers, or domain configuration options.
The interface varies between registrars. Common section names include:
- Domain Management
- DNS Configuration
- Nameservers
- Advanced Settings
Find the section where you can update nameservers or DNS records. This is where you’ll point your domain to your new WordPress host.
Changing Nameservers
Nameservers tell the internet where to find your website. Your WordPress host provides specific nameserver addresses. These replace your current Blogger-connected nameservers.
According to WP WebInfoTech, preserving your SEO requires careful attention during DNS updates. (Source: WP WebInfoTech)
To update nameservers:
- Get nameserver addresses from your WordPress host
- Log into your domain registrar
- Locate nameserver settings
- Replace existing nameservers with your host’s servers
- Save changes
Here’s an example of common nameserver formats for popular hosts:
| Hosting Provider | Primary Nameserver | Secondary Nameserver |
|---|---|---|
| Bluehost | ns1.bluehost.com | ns2.bluehost.com |
| SiteGround | ns1.siteground.net | ns2.siteground.net |
| HostGator | ns1.hostgator.com | ns2.hostgator.com |
| GoDaddy | ns73.domaincontrol.com | ns74.domaincontrol.com |
Your specific nameserver addresses come from your hosting provider. Always use the exact addresses they provide. Even small typos can cause connection failures.
DNS Propagation Period
DNS changes aren’t instant. They require propagation time across the internet. During this period, some visitors might see your Blogger site while others see WordPress.
The propagation process typically takes 24-48 hours to complete globally. Some regions update faster than others. Your own computer might cache old DNS information, making testing confusing.
To monitor propagation:
- Use online DNS checker tools
- Check from different devices and networks
- Clear your browser cache when testing
- Be patient during the transition period
During propagation, both your Blogger and WordPress sites should remain operational. This ensures visitors can access your content regardless of which version they see.
Step 5: Removing Custom Domain from Blogger
After updating DNS, remove your custom domain from Blogger. This prevents redirect loops and confusion during the transition. Timing this step correctly helps maintain site accessibility.
Wait until DNS propagation begins before removing your custom domain. This ensures your WordPress site is reachable before disconnecting from Blogger. Monitor propagation using online DNS checkers.
Accessing Blogger Settings
Blogger stores domain settings in the platform’s dashboard. Accessing these settings requires admin rights to your Blogger account. The interface is straightforward but requires careful attention.
To access domain settings:
- Log into your Blogger account
- Select your blog from the dashboard
- Click on Settings in the left sidebar
- Navigate to the “Publishing” section
This section displays your current domain configuration. You’ll see your custom domain listed here. Take note of all settings before making changes for future reference.
Updating Publishing Options
Removing your custom domain reverts Blogger to its default address. According to JoomDev, this step is essential for preventing conflicts after DNS changes. (Source: JoomDev)
To remove your custom domain:
- In the Publishing section, find “Custom domain”
- Click on “Switch to” next to your Blogspot address
- Confirm the change when prompted
- Save your settings
After this change, your Blogger blog reverts to its original blogspot.com address. Your content remains accessible at this address during and after migration. This provides a backup access point if needed.
Some traffic may still reach your Blogspot address after migration. Consider adding a notice about your new WordPress location. This helps visitors find your current site if they use old bookmarks.
Step 6: Setting Up Redirects
Redirects ensure visitors and search engines find your content at its new location. Proper redirects maintain your search rankings and user experience. They tell browsers to automatically go to your WordPress site.
Several redirection methods exist for Blogger to WordPress migrations. The most effective approach uses a specialized plugin with Blogger template modifications. This creates seamless 301 redirects for all content.
Installing the Redirection Plugin
WordPress offers several redirection plugins. For Blogger migrations, the “Blogger to WordPress Redirection” plugin works best. This tool generates custom code for your Blogger template.
To install the redirection plugin:
- Log into WordPress dashboard
- Go to Plugins → Add New
- Search for “Blogger to WordPress Redirection”
- Click “Install Now” then “Activate”
After activation, the plugin adds a menu item under Tools. This interface generates the redirection code for your Blogger template. The code redirects visitors and preserves SEO value.
Configuring Redirects from Blogger to WordPress
With your plugin installed, you’ll generate and implement redirect code. According to ScalaHosting, proper redirects are essential for preserving SEO during platform migrations. (Source: ScalaHosting)
Follow these steps to configure redirects:
- Go to Tools → Blogger to WordPress Redirection
- Enter your Blogger blog URL (the blogspot.com address)
- Click “Generate Code”
- Copy the generated JavaScript code
- Log into your Blogger account
- Go to Theme → Edit HTML
- Paste the code just before the </head> tag
- Save the template
This code redirects all Blogger traffic to your WordPress site. It matches old URLs with their new WordPress equivalents. The redirects use the 301 status code, which preserves SEO value.
For mobile users, Blogger adds a ?m=1 parameter to URLs. The redirection plugin handles these variations automatically. This ensures all visitors reach your new site regardless of how they access it.
Post-Migration Considerations
After completing the technical migration, several tasks remain. These steps ensure your new WordPress site works correctly. They also help maintain your search rankings and user experience.
Take time to thoroughly test your migrated site. Check various devices, browsers, and connection speeds. Identify and fix any issues before promoting your new WordPress website.
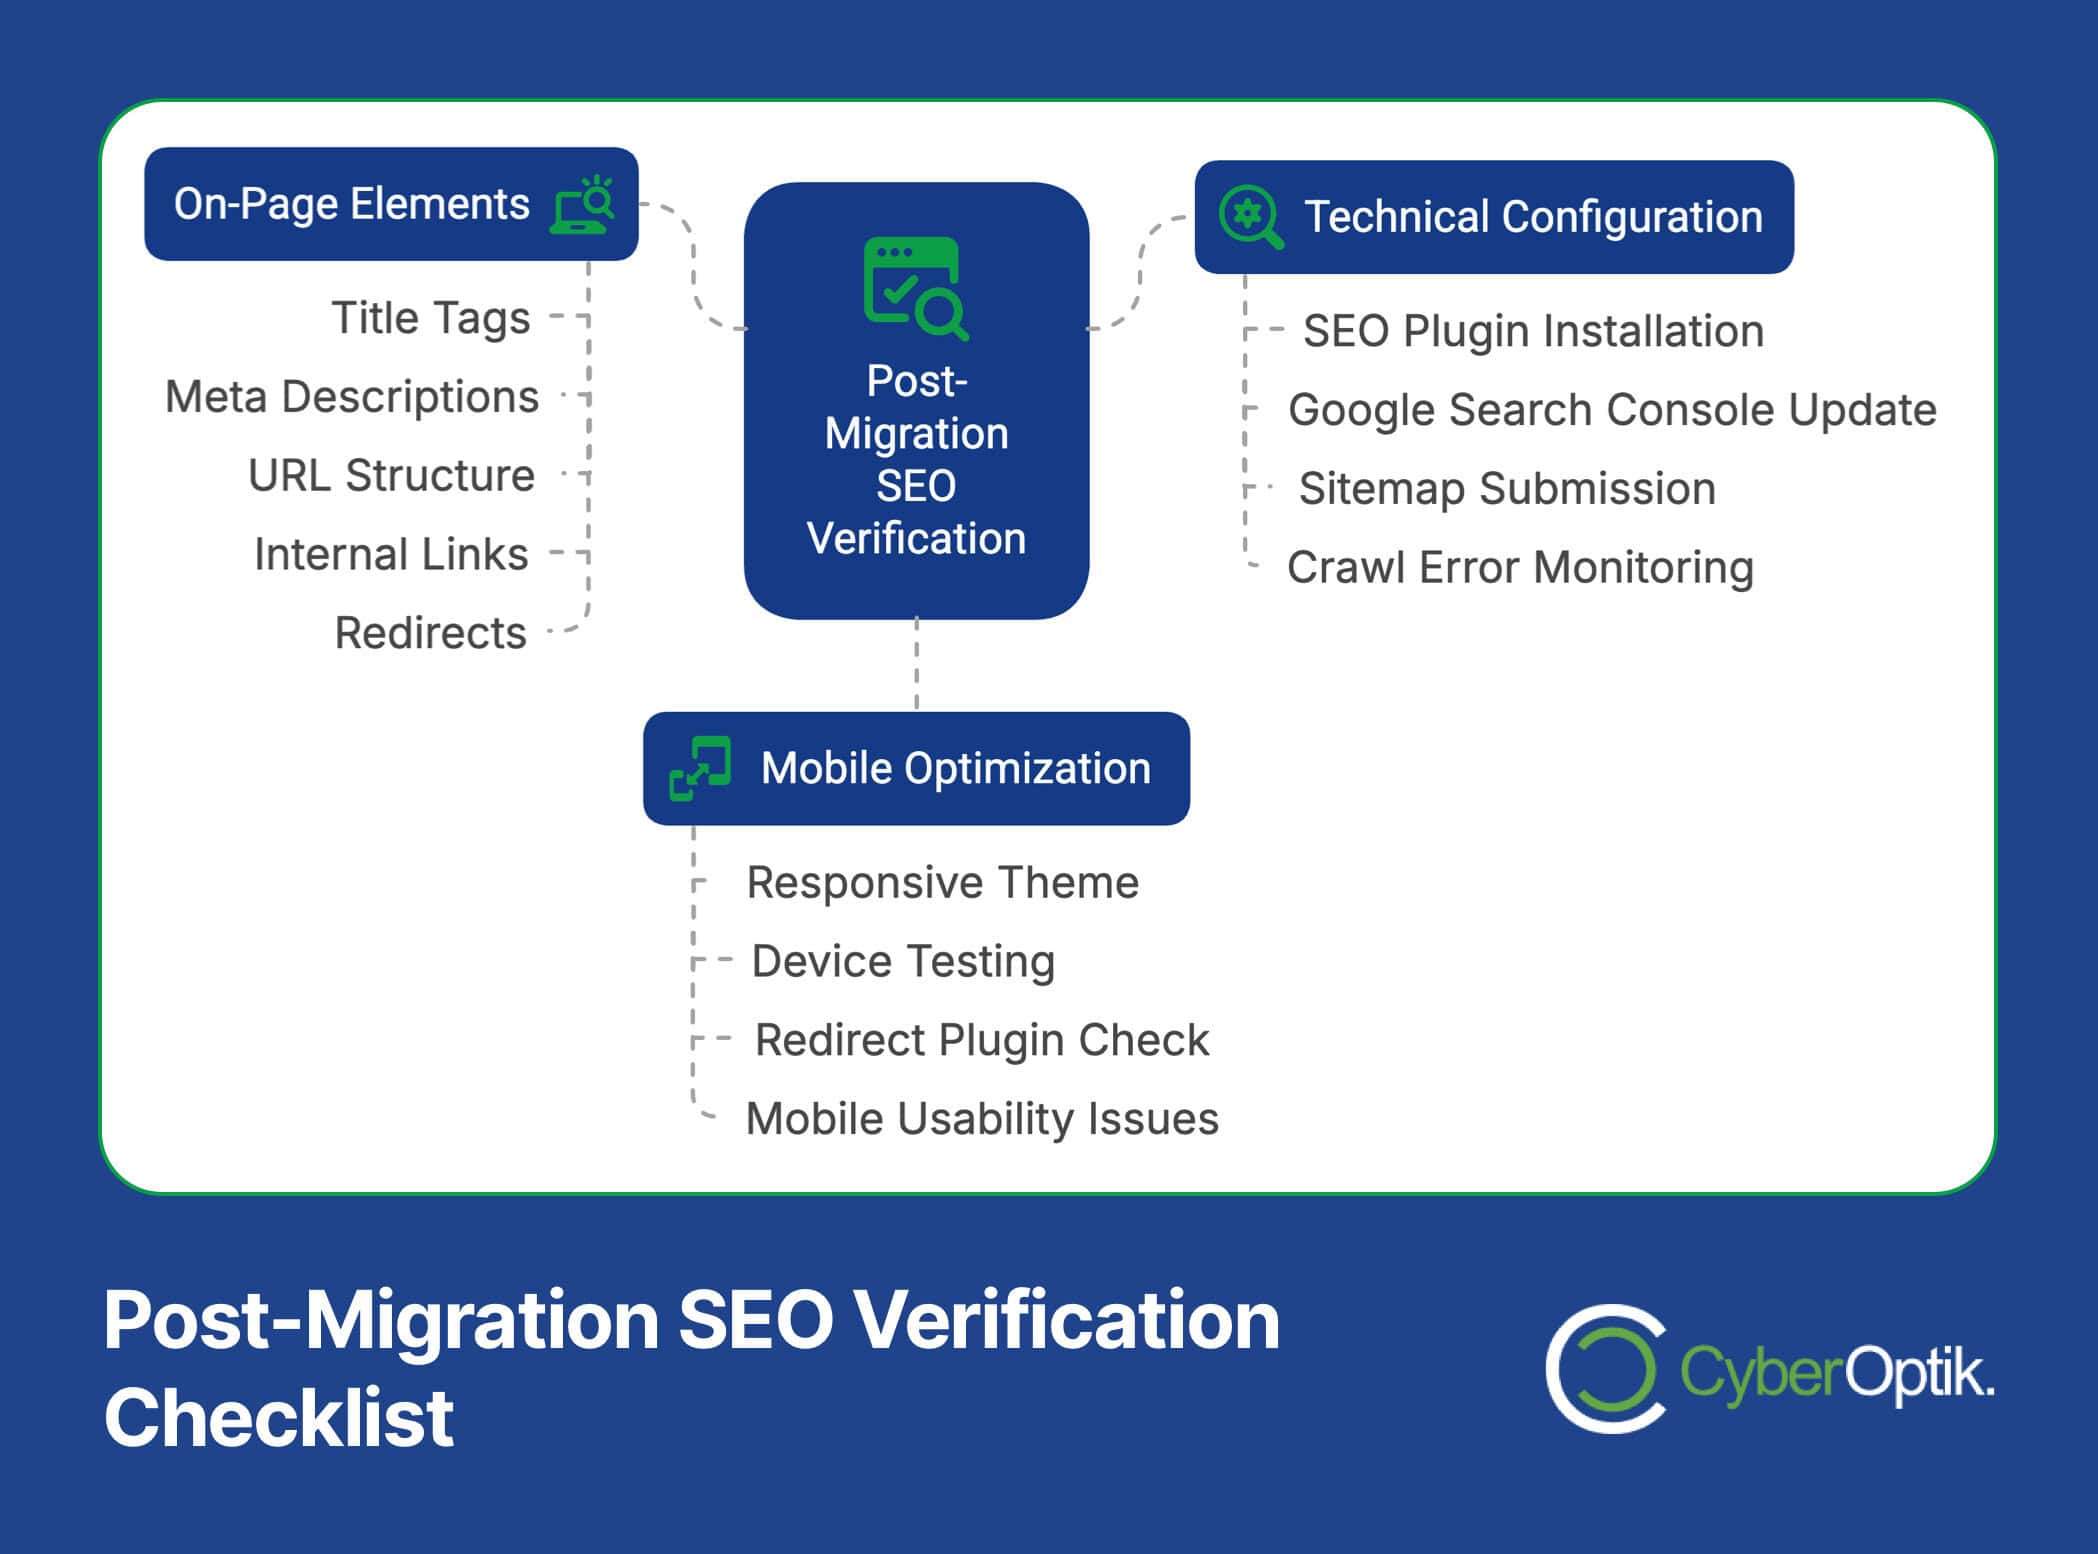
SEO Checks and Updates
SEO preservation requires careful verification after migration. Check these key elements:
| SEO Element | What to Check | How to Fix Issues |
|---|---|---|
| Title Tags | Verify titles transferred correctly | Edit in WordPress SEO plugin |
| Meta Descriptions | Confirm descriptions are preserved | Add missing descriptions in SEO settings |
| URL Structure | Ensure URLs match old format | Update permalink structure or create redirects |
| Internal Links | Check for broken internal links | Update links to use new URLs |
| Redirects | Test redirects from old URLs | Fix redirect code or use WordPress plugins |
Install an SEO plugin like Yoast SEO or Rank Math to help manage these elements. These tools provide optimization recommendations and sitemap generation.
Update your Google Search Console property to the WordPress site. Submit your new sitemap and monitor for crawl errors. Address any issues promptly to maintain search visibility.
Mobile Redirect Handling
Blogger adds mobile parameters to URLs for responsive design. According to Josef Jakobs, these parameters can cause issues during migration if not properly addressed. (Source: Josef Jakobs)
WordPress handles mobile display differently than Blogger. Your WordPress theme should be responsive by default. This eliminates the need for separate mobile URLs.
To ensure proper mobile handling:
- Choose a responsive WordPress theme
- Test your site on multiple mobile devices
- Verify the redirection plugin handles mobile parameters
- Check Google Search Console for mobile usability issues
If you find mobile redirect problems, additional configuration may be needed in your redirection plugin. Most modern plugins handle these variations automatically.
Testing Your New Website
Thorough testing prevents visitor frustration and lost traffic. Create a testing checklist covering all site functionality. Address any issues before considering the migration complete.
Key areas to test include content display, navigation, forms, and comments. Also check your internal search functionality and page load speeds on various connections. Verify responsive design on different devices.
With proper website speed optimization, your newly migrated site can perform better than before. Run speed tests to identify any performance issues that need addressing.
Troubleshooting Common Issues
Even careful migrations sometimes encounter problems. Understanding common issues helps you resolve them quickly. Most problems have straightforward solutions if approached systematically.
Here are the most frequent challenges during Blogger to WordPress migrations:
Handling DNS Propagation Delays
DNS propagation sometimes takes longer than expected. This can cause confusion about whether your migration worked. Remember that propagation happens gradually across different regions.
If you’re experiencing propagation delays:
- Be patient – the process can take up to 48 hours
- Use online DNS checkers to monitor progress
- Clear your browser cache when testing
- Try accessing your site from different networks
During propagation, maintain both your Blogger and WordPress sites. Keep redirects active on the Blogger side. This ensures visitors can access your content regardless of which DNS servers they’re using.
Fixing Permalink Conflicts
Permalink conflicts occur when WordPress URLs don’t match your Blogger structure. This breaks redirects and can harm SEO. The solution involves adjusting your WordPress permalink settings or creating custom redirects.
If you notice permalink mismatches:
- Compare several post URLs between platforms
- Identify pattern differences
- Adjust WordPress permalink structure in Settings
- Create custom redirects for exceptions
The Redirection plugin for WordPress helps manage complex redirect scenarios. It allows you to create rules for specific URL patterns. This solves cases where simple permalink adjustments aren’t sufficient.
Wondering how to improve WordPress search functionality after your migration? Installing a search enhancement plugin can greatly improve the user experience on your new site.
Dealing with Missing Content
Sometimes content doesn’t transfer completely during import. Posts, images, or formatting might be missing. A systematic approach helps recover these elements.
If content is missing, compare post counts between platforms and check your media library for missing images. Look for formatting issues in transferred posts. Try reimporting problem content individually or consider manual recreation for critical elements.
For persistent issues, specialized WordPress migration services can help. These services handle complex transfers that automatic tools struggle with. The investment often saves time and preserves content value.
Conclusion
Domain transfers require attention to detail. By following this guide, you’ve successfully moved your custom domain from Blogger to WordPress. Your content now lives on a more powerful and flexible platform. The migration preserves your SEO value while opening new possibilities.
WordPress offers significant advantages for growing businesses. You now have access to thousands of themes and plugins. These tools help you create a truly customized website. Your new platform scales with your business needs more effectively than Blogger.
Remember to monitor your site performance in the weeks following migration. Check Google Search Console for any unexpected issues. Continue optimizing your WordPress site to maximize its potential. Consider exploring advanced features like e-commerce integration or membership capabilities.
Need help with technical SEO after migration? Our team specializes in WordPress development and optimization. We help Chicago businesses maximize their online presence through strategic web design and development. Contact us today to discuss how we can help you get the most from your new WordPress website.